Showing posts with label ipad. Show all posts

Wednesday, July 26, 2017

Digital Publishing 2.0; publication numérique 2.0 (post bilingue)


English

The first generation of digital publishing delivered the electronic equivalent of a book. But not all books. It was for books with layouts and content that were simple enough for the small black–and–white screens of e–readers. This means that digital publishing opportunities were pretty much limited to trade books and newspapers. Magazines and about 85% of books have not been able to reach these devices, nor have corporations or other organisations been able to tap into them, because they just aren't suitable for design–rich content and their displays are too limited. The introduction of iPad brought about a revolutionary change.

Digital Publishing 2.0 is marked by the introduction of an entirely new digital experience — one that promises an unprecedented level of consumer interaction with content through smartphones, e–readers, and tablets, as well as an equally engaging experience through computers.

Digital Publishing 2.0 technology delivers a full-color, interactive multimedia experience through larger, more sophisticated displays in which consumers explore content (whether books, magazines, newspapers, product catalogs, advertisements, or other material) through clickable videos, sound files, and other interactive functionality.

The most important difference between Digital Publishing 2.0 and Digital Publishing 1.0 is that it offers publishers and others a variety of ways to distinguish digital content from traditional content. This means publishers can — at least potentially— develop new revenue models for digital experiences.

ref

http://www.quark.com/en/Solutions/Content-Automation/Digital-Publishing.aspx

Français

Le Digital Publishing (publication numérique) de première génération permettait de produire l'équivalent d'un livre au format électronique. Mais pas de tous les livres. Seuls étaient concernés les livres à la mise en page et au contenu suffisamment simples pour être adaptés aux petits écrans en noir et blanc des lecteurs numériques. Les possibilités de publication numérique étaient donc généralement limitées aux ouvrages professionnels et aux journaux. Les grandes entreprises et autres organisations n'ont pas pu les utiliser car ils n'étaient pas compatibles avec les contenus dotés d'un graphisme riche et à cause de leurs écrans trop limités. Le lancement de l'iPad et iPhone (puis tablette android) a été à l'origine d'un changement révolutionnaire.

Le Digital Publishing 2.0 est marquée par la naissance d'une toute nouvelle expérience numérique qui promet aux clients un niveau d'interaction sans précédent avec les contenus via les smartphones, lecteurs numériques et tablettes, ainsi qu'une expérience tout aussi passionnante sur ordinateur.

La technologie mise en œuvre dans la Publication numérique 2.0 offre une expérience multimédia interactive toute en couleurs sur des écrans plus grands et plus évolués avec lesquels les clients peuvent explorer des contenus (livres, magazines, journaux, catalogues de produits, publicités ou autres) comme des vidéos, des fichiers audio, tout cela en un seul click.

La Publication numérique 2.0 se distingue avant tout de la Publication numérique 1.0 car elle offre différents moyens de démarquer les contenus numériques des contenus traditionnels. Les éditeurs et autres intervenants ont donc la possibilité de développer de nouveaux modèles de revenus pour les expériences numériques.

Les défis du multi-canal

Les défis liés à la mise en place de stratégies rentables pour le Digital Publishing 2.0

Malgré la popularité et la croissance rapide des terminaux mobiles, des défis de taille sont à relever dans la course au succès du Digital Publishing 2.0.

Tout d'abord, les éditeurs doivent créer des contenus dotés de fonctionnalités avancées, ce qui peut exiger une programmation complexe et beaucoup de travail technique. Ils doivent créer ces contenus enrichis pour différentes plates-formes, pour des terminaux qui arrivent sans cesse plus nombreux sur le marché et pour les différents types de supports. Afin de mener ces tâches à bien en limitant les coûts, vous avez besoin d’outils permettant aux concepteurs (et non aux développeurs) de créer du contenu enrichi qui fonctionnera correctement sur la totalité des plates-formes, des terminaux numériques et des supports.
Ensuite, le contenu enrichi doit fonctionner dans une application qui fournit non seulement toutes les fonctionnalités multimédia interactives attendues par le client, mais aussi d'autres qui le surprendront.
Pour finir, des canaux de distribution sont requis qui faciliteront pour un client la recherche, l'achat et le téléchargement de votre contenu.

Solution-> Créez des contenus interactifs enrichis indépendants de la plate-forme, du média et du périphérique numérique

Les logiciels (comme Quark ou Indesign ou Scribus ou autres PAO) peuvent vous aider à incorporer la publication numérique dans votre stratégie de publication multicanal pour cibler les tous derniers terminaux mobiles, y compris les tablettes comme l'iPad™ ou Iphone d'Apple® et les Galaxy Tab® ou smartphone de Samsung comme les ordi portables Gnu/linux, mac OSX, windows. De plus, avec la stratégie de contenus indépendants du média de Quark, nos logiciels vous protègent contre les errances permanentes de la technologie liées à l'apparition de nouveaux appareils sur le marché.

L'approche de Quark en matière de publication numérique repose sur deux fondements clés :
  1. Indépendance vis-à-vis des plates-formes : vous ne pouvez pas vous permettre de créer du contenu et de développer des applications pour chaque plate-forme, support et appareil. C’est pour cette raison que, au lieu de limiter vos données à un format spécifique, Quark vous permet de créer des contenus indépendants des plates-formes et des supports. Vous pouvez ainsi publier automatiquement dans tous les formats qui vous conviennent.
  2. Aucune programmation requise : nos logiciels permettent aux concepteurs graphiques de se lancer dans des expériences interactives fascinantes sans avoir à faire appel aux développeurs.

Publication numérique : une capacité de base d'une solution de publication dynamique

Nos capacités de publication numérique font partie intégrante de notre solution de publication dynamique, qui permet à de grandes entreprises d'améliorer leur productivité et de réaliser des économies sur les coûts dans tous leurs environnements de publication d'entreprise. L'utilisation de notre solution de publication dynamique permet à chacun de créer un contenu XML structuré dans Microsoft Word, d'automatiser l'assemblage de contenus personnalisés et de conception élaborée destinés à plusieurs publics, et de publier automatiquement sur papier, Web et terminaux numériques.

CRÉATION DE CONTENUS XML

Création XML, création structurée, création de contenu intelligent. Ces trois processus désignent le même concept : une méthode de création de contenu différente de celles proposées par les applications de traitement de texte et PAO qui génèrent, quant à elles, du contenu non structuré. De plus en plus d'entreprises se tournent vers la création de contenus XML car il s'agit de la première étape pour améliorer le processus de publication et obtenir ainsi plus de qualité et de flexibilité tout en réduisant les coûts.

Pourquoi choisir la création de contenus XML ?

Parce que la création de contenus non structurés — la base des logiciels de traitement de texte et de PAO — n'est plus en mesure de répondre aux exigences de publication des entreprises qui doivent fournir toujours plus d'informations de meilleure qualité, et à un tarif inférieur, pour davantage de types de supports.

Mais avec les logiciels de publication classiques, les rédacteurs ne se contentent pas de créer les informations : ils doivent également les mettre en forme et contrôler chaque élément de la mise en page, un processus extrêmement laborieux qu'il faudra répéter pour chaque type de support : 
  • papier, 
  • Web 
  • numérique. 
En outre, pour réutiliser les informations, il faut procéder par copier-coller, d'où la création de copies redondantes qui doivent être relues, traduites et mises à jour séparément, et ce aussi longtemps que les informations vivent. Ces carences entraînent des problèmes de précision, d'accessibilité et de présentation des informations car le volume de travail est trop important et accroît les risques d'erreur.

Fonctions de création XML

Pour surmonter les inefficacités liées au contenu non structuré, la création de contenus XML offre 5 avantages clés.

1/Dissociation du contenu et de sa mise en forme : 

au lieu d'appliquer une mise en forme pour différencier les divers éléments d'un document (par exemple, faire en sorte qu'un titre soit plus grand qu'un sous-titre), le rédacteur définit la fonction de chaque élément. Par exemple, il peut désigner le titre sous la forme <title>, et non pas 24 pt. Arial Bold.

2/Publication automatisée : 

les documents XML ne contenant aucune information de mise en forme, un système de publication peut appliquer séparément une mise en forme via un processus automatisé. Par exemple, le système peut désigner un élément <title> sous la forme 24 pt. Arial Bold dans la version papier et sous la forme 12 pt. Verdana sur un téléphone mobile. Ainsi, les rédacteurs n'ont pas à se soucier de la mise en forme et de la conception, des tâches laborieuses pouvant monopoliser le tiers voire la moitié de leur temps de travail.

3/Publication multicanal : 

vous pouvez publier automatiquement vos informations pour différents types de supports : papier, Web et terminaux mobiles. Cette méthode évite à un autre groupe de devoir créer manuellement chaque type de support supplémentaire, un processus long, coûteux et risquant d'induire des erreurs.

4/Composants réutilisables : 

le format XML permet aux rédacteurs de fractionner leurs documents en plusieurs composants réutilisables. Au lieu de copier-coller le contenu, ils peuvent réutiliser un composant simplement en y faisant référence. En cas de modification du composant original, tous les documents qui l'utilisent peuvent être automatiquement mis à jour avec la dernière version des informations de ce composant. Cette méthode améliore la précision et la cohérence des données.

5/Personnalisation : 

le format XML permettant de fractionner les documents en plusieurs composants, vous pouvez assembler automatiquement ces composants afin d'obtenir des publications personnalisées en fonction des besoins de chaque public, ce qui augmente la satisfaction du client.
---

Création XML depuis Quark

Quark Author est un logiciel basé sur le Web conçu spécifiquement pour permettre aux utilisateurs métier de créer du contenu XML, mais dans un environnement de traitement de texte familier, laissant le XML dans les coulisses. Les rédacteurs peuvent créer et réutiliser des composants de contenu qui sont gérés avec Quark Publishing Platform.

Quark XML Author for Microsoft® Word permet à chaque utilisateur de créer du contenu XML structuré dans Microsoft Word. Conçu pour une prise en main facile et rapide, Quark XML Author établit les bases d'un système de publication automatisé capable de rationaliser votre processus de publication, d'augmenter la cohérence de vos informations et d'améliorer ainsi les résultats de votre entreprise.
Lancé en 2002, Quark XML Author™ for Microsoft Word est un outil de création XML de nouvelle génération. Il se présente sous la forme d'un module complémentaire pour Microsoft Word qui permet à tout utilisateur de créer facilement des documents XML, sans connaissance de ce langage ni formation.

XML : le meilleur moyen de créer des informations

Le XML est une norme complexe et le fait de devoir se servir d'outils logiciels spécialisés le rend encore plus compliqué à apprendre pour les rédacteurs.

Création de documents XML dans Microsoft Word

Quark XML Author for Microsoft Word permet à tout utilisateur de créer facilement des documents XML, sans connaissance de ce langage ni formation. Quark XML Author est un module d'extension pour Microsoft Word qui permet aux rédacteurs de créer des composants d'information utilisables directement dans Quark Publishing Platform, qui les combine automatiquement de manière appropriée pour produire des documents imprimés de grande qualité ou des versions numériques pour le Web ou d'autres supports électroniques.

Comme Quark XML Author fonctionne au sein même de Word, vous pouvez le déployer dans toute votre entreprise de manière à profiter des gains d'efficacité et des améliorations apportées à tous les documents issus des différents services grâce au format XML.

Quark_Publishing_Platform

Les modules de Quark Publishing Platform fonctionnent de manière complémentaire pour permettre l'assemblage automatisé et la publication multicanal de contenu pour différents publics et types de médias.

La plate-forme constitue une solution de publication personnalisable complète facilitant la création de communications ciblées et pertinentes qui améliorent la relation avec le client et renforcent son niveau de satisfaction. Outre le papier et le Web, Quark Publishing Platform prend également en charge la réutilisation et la réorientation du contenu et de la mise en page pour la diffusion de communications numériques interactives riches et attrayantes pour les terminaux mobiles et les tablettes.
voir photo au début de ce post.

Pour en savoir plus, merci de sélectionner un des modules de Quark Publishing Platform sur:
http://www.quark.com/fr/Products/Quark_Publishing_Platform/How_It_Works.aspx
l est rigolo de voir que quark a utilisé adobe edge 5.0 (librairie js) qui n'est plus développé depuis fin 2015...

ref

http://www.quark.com/fr/Solutions/Content-Automation/Digital-Publishing.aspx

Wednesday, July 19, 2017

sony alpha and others camera (Canon, Nikon, Fuji) and HDR Remote/time-lapse accessories (remote input, flash shoe)

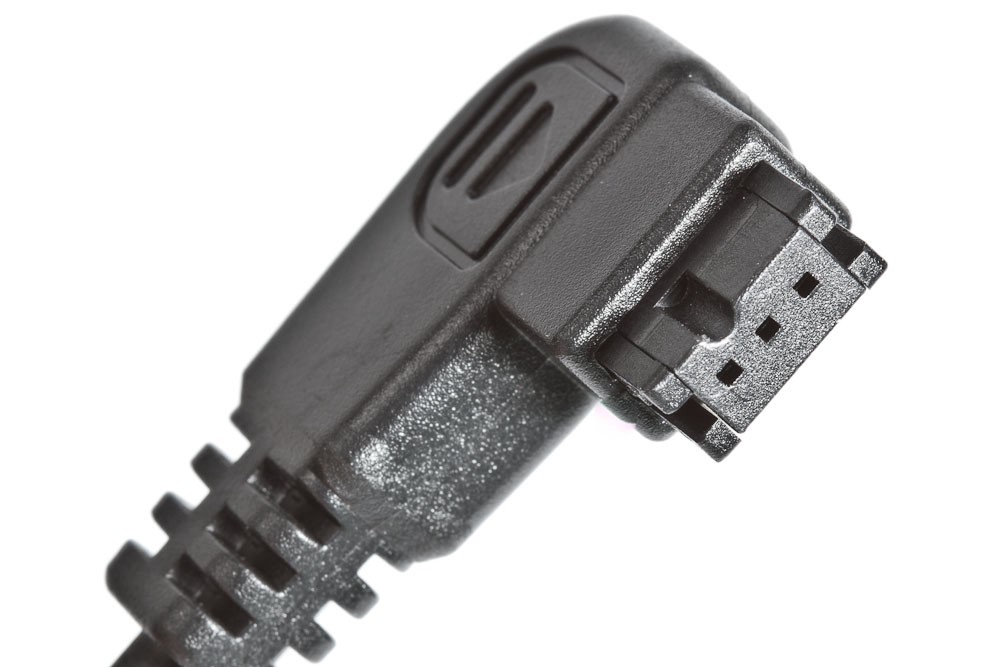
"old" minolta sony connector
voir la liste de tous les connecteurs de toutes les marques

That port has 3 pins : one is focus & the other is the shutter. 


My problem is, the sony a65 only does -.7 to .7 bracketing in 3 shots and I'm looking for something that will be better.. I thought that maybe there are remotes with time lapse or otherwise that will work better.

Sony offers several different remote shutter releases. The Sony RM-S1AM and RM-L1AM Remote Commander are wired remote shutter releases. They are functionally identical, the RM-S1AM has a short 50cm cable, while the RM-L1AM features a much longer 5m cable. These remotes are based on the Minolta RC-1000S and RC-1000L which date back to 1985. Both the Sony and Minolta wired remotes have the same camera connection terminal, so I have lumped them together in the following chart.  Any Sony camera that supports a wired remote can be triggered by any of the four.

The same cameras can be triggered with any of the DIY Shutter Remote designs I posted here in the past (http://alphatracks.com/archives/167). There are also various third party remote shutter releases that should work with these camera models.

https://www.dpreview.com/forums/thread/3355038

First, note that these remotes do (almost) nothing but activate the shutter (a few have time lapse).  You need to set the camera to bracket for HDR or whatever it is you want to do.

http://support.d-imaging.sony.co.jp/www/cscs/accessories/?area=gb&lang=en

When in-camera HDR is enabled, the function menu for the wireless remote, 2s, 10s or any other option is disabled.
The a65 cannot use an IR remote while taking an in-camera HDR NOR can the camera's 2sec or 10sec shutter delay feature be used to get around it.  The only way to get around it is to use a wired cable release attached to the wired remote port-- preferably one with a countdown timer.

triggerTrap the best choice

If you have a smartphone, take a look at one of these: triggerTrap
Triggertrap for iOS and Android is now open source:
https://medium.com/triggertrap-playbook/triggertrap-going-out-of-business-faq-988112eebfef
https://medium.com/triggertrap-playbook/triggertrap-for-ios-and-android-is-now-open-source-a194350e9cfc

https://medium.com/triggertrap-playbook/now-open-source-triggertrap-mobile-dongle-e89e5f542d00

Triggertrap’s camera triggering infrastructure is based on 3 parts:

  • The Triggertrap Mobile App is pretty simple: It outputs a 19 khz sine-wave tone for a very specific duration. Of course, the magic is in how often, for how long, and how fast you send the tone. We are planning on open-sourcing our iOS and Android app in the next month — stay tuned.
  • The Triggertrap Mobile Dongle plugs into your phone. It takes this tone and turns it into a switch — if the tone is played, it closes the circuit. If not, it, er, doesn’t.
  • Finally, you need a camera connection cable running from the Mobile Dongle to the camera. There are quite a few different ones — to find the right one, try this https://medium.com/triggertrap-playbook/slr-camera-remote-control-sockets-ff2e84482682

Triggertrap Timelapse Pro is a new approach to creating awesome timelapses. Connect your device to your camera with a Triggertrap Mobile kit, and you're set to get creative! 
Triggertrap has announced Timelapse Pro, a new app for its mobile camera control kits that gives time-lapse photographers more flexibility in creating complex sequences than the basic Triggertrap app.
The app opens to the door to “modular timelapse creation,” the company says. In addition to standard intervalometer functions, which trigger your camera’s shutter every X number of seconds, the app has special delay modules.


Any wired remote will do the job, some have different interfaces for timelapse control but I would say that all of them will do exactly the same thing as a result. They do not control shutter speed or aperture from the remote, they simply fire the trigger. At least with the ones I have seen for Sony cams, the iPhone apps however like TriggerTrap do provide variable shutter speed control.

Building a Triggertrap compatible Mobile Dongle

As Triggertrap is currently on its way out of business (2017), we are getting a lot of requests from people who want to buy a Triggertrap Mobile Dongle. There are still a few floating about, but they are harder to find that you would imagine.
We want to open-source the hardware we have been creating for a long time, so the design files are now available on GitHub.
https://github.com/Triggertrap/mobile-dongle
Hardware Open Source for creating a clone of a Triggertrap compatible Mobile Dongle

There have also been DIY attempts at building a Triggertrap-compatible Mobile Dongle in the past:
Building a DIY Triggertrap Mobile Dongle (DIYPhotography)
http://www.diyphotography.net/building-diy-trigger-trap/
DIY TRIGGERTRAP DIAGRAM


3 pins : one is focus & the other is the shutter. 

Infrared (IR) Remote Shutter Releases

Sony has also developed two sophisticated infrared remotes, which operate much the same way as your television remote. The use of these remotes varies with different camera bodies.  Some cameras can use either remote while only certain features work on some cameras. Sadly, there are some cameras that do not offer any remote release capability. This chart should help you determine which remotes work with your camera.

Except for the 2 SEC, SHUTTER and START/STOP buttons, the buttons only work when the camera is connected to a TV.
https://www.sony.com/electronics/interchangeable-lens-cameras-tripods-remotes/rmt-dslr2
Pour utiliser la télécommande, réglez le mode d’activation de l’appareil photo sur [Télécommande]. Assurez-vous que le sujet est net et appuyez sur la touche SHUTTER, la touche 2 SEC ou la touche START/STOP*.
 Touche SHUTTER
Lorsque le déclencheur est pressé, l’obturateur s’ouvre et se ferme immédiatement.
 Touche 2 SEC
Lorsque vous appuyez sur cette touche, l’obturateur s’ouvre et se ferme deux secondes plus tard environ.
 Touche START/STOP*
Une pression sur la touche lance l’enregistrement vidéo.
Une nouvelle pression sur la touche pendant l’enregistrement vidéo arrête l’enregistrement vidéo.
* Ne peut être utilisé que si l’appareil photo peut enregistrer des vidéos.
Selon le modèle de l’appareil photo enregistrant
des vidéos, la marche (START) et l’arrêt (STOP) de l’enregistrement sont con rmés par l’illuminateur AF ou le témoin de retardateur de l’appareil photo.
Véri ez si votre appareil photo est compatible pour cet usage.
 Pour le détail sur les réglages, reportez-vous au mode d’emploi de l’appareil photo.
 Les autres touches sont utilisées lorsque l’appareil photo est raccordé à un téléviseur.

Table of Sony Alpha Remote Shutter Release Support by Camera Body:
https://www.sony.com/electronics/interchangeable-lens-cameras-tripods-remotes/rm-vpr1#product_details_default

Camera
Wired Remote
(RM-S1AM or RM-L1AM)
RMT-DSLR1
(Wireless Infrared)
RMT-DSLR2
(Wireless Infrared)
RM-VPR1
(Remote Control with Multi Terminal Cable)
Sony AlphaA100X
Sony AlphaA200X
Sony AlphaA230XX **
Sony AlphaA290XX **
Sony AlphaA300X
Sony AlphaA330XX **
Sony AlphaA350X
Sony AlphaA380XX **
Sony AlphaA390XX **
Sony AlphaA450XXX**
Sony AlphaA500XXX**
Sony AlphaA560XX*X
Sony AlphaA580XX*X
Sony AlphaA700XXX**
Sony AlphaA850XXX**
Sony AlphaA900XXX**
Sony Alpha A33XX*X
Sony Alpha A35X
Sony Alpha A37XX
Sony Alpha A55XX*X
Sony Alpha A57XX*XX
Sony Alpha A58X
Sony Alpha A65XX*XX
Sony Alpha A77XX*XX

http://alphatracks.com/sony-alpha-wired-remote-shutter-release

 shoe

If you want to control more than focus/trigger (via the 3 pins) or IR (very poor master/slave link; camera is connected to a TV...), then you need another strategy.
The "input" is an equivalent of flash units to be mounted via a standardized "accessory mount" bracket : a hot shoe.
The dimensions of the hot shoe are defined by the International Organization for Standardization in ISO 518:2006, but manufacturers differ in details such as trigger voltage and thus incompatibilities are still possible between brands.

Sony called it the Auto-lock Accessory Shoe (AAS).

TTL
“TTL” means “Through The Lens”, ie. light is metered through the lens and all other optical elements that influence exposure. The meter will see the same light that the film sees. This means that filters, extension tubes etc. are automatically factored in the flash metering.
“OTF” means “Off The Film”. Light is metered while the shutter is open, and as it is reflected off the film during exposure.
Here's how the system works:

  1. The shutter is opened by the camera
  2. The flash is triggered and starts to emit a light pulse
  3. Light reflected from the film surface is metered. This includes both ambient light and light coming from the flash.
  4. When an amount of light is detected that results in correct exposure, the flash unit is turned off, ie. the light pulse is shortened.
  5. The shutter is closed.

The nice thing about TTL-OTF metering is that it gets things mostly right automatically. When flash output is reduced by a diffusor or by increased distance, or when a filter reduces light reaching the film, the camera simply lets the flash burn longer.

The downside is that the camera is fooled by subjects that are brighter or darker than mid-toned. The camera doesn't know what tonality an object is, it just sees the light reflected by it. When mid-toned exposure is reached, the flash is cut off. So if you photograph a white wall with this system, you will get an image of a grey wall instead of a white wall. Just as with ambient exposure you have to apply exposure compensation to correct exposure for subjects that are not mid-toned.
TTL-OTF metering is the default with most Minolta film cameras and flashes. It's also the fallback mode for more advanced metering modes.
ADI
ADI was developed to overcome the limitations of TTL metering, specifically the problems with objects of very high or low reflectivity. The basic idea is to automate the processes of manual flash. The exact distance to the subject is provided by D lenses. A flash unit is required that allows adjusting the flash power in fine increments by the camera (D flashes). With such a system the distance, film speed and aperture is known to the camera, it calculates the required GN for correct exposure from these parameters, and sets up the flash unit to emit a flash of exactly that intensity. During the shot, no light is metered and flash output is not adjusted. This way bright objects again appear bright.
There are a few limitations for this system:
  • The flash must be mounted on the camera. That's because the camera only knows the focus distance, not the flash distance. Only when the flash is mounted on the camera it can assume the two to be the same.
  • The flash must point straight ahead. With bounce flash the distance the light travels is longer than the focus distance, and the reflecting surfaces absorb some light. The camera doesn't know these factors, so it can't include them in the calculations.
  • Equipment that influences either flash output (diffusors, concentrators) or effective aperture (filters) can't be used. Again, the camera doesn't know these factors, so it can't include them in the calculations.
  • Some of these situations can be detected by the camera (e.g. flash head tilted up). In these cases it automatically falls back to TTL metering (either TTL-OTF or Pre-Flash-TTL, depending on the type of camera).
  • In a mixed light situation, the camera combines pre-flash metering and distance based metering. This is why ADI requires HSS and therefore pre-flash metering to be enabled on the flash unit. However, the Dynax/Maxxum 7 can also use pure ADI metering with the built-in flash, which does not support pre-flash metering.
  • Distance information is not only provided by D lenses. Also with non-D lenses, the camera can determine the focus distance. The camera initializes the lens by moving it to infinity focus, and then it uses parameters from the lens ROM to calculate the focus distance from the number of rotations of the AF drive. For this to work, a mechanical focus range limiter of the lens has to be disengaged when the camera is turned on so that inifinity focus can be reached at that time.
  • Furthermore, cameras that have an electro-mechanical clutch and rotation encoder in the AF drive (these are the cameras that support DMF) can track the movements of the focus ring even in manual focus mode. These cameras can use ADI even with non-D lenses in manual focus mode. Some of these cameras also have a Smooth MF feature, which mechanically de-couples the lens AF drive from the camera AF drive (including the rotation encoder). When Smooth MF is enabled, the camera reverts again to TTL metering.

Since 1988, Minolta switched to use a 4-pin proprietary slide-on auto-lock "iISO" connector. A compatible 7-pin variant, which allows battery-less accessories to be powered off the camera's battery existed as well, but was not widely used. Konica Minolta and Sony Alpha digital SLR cameras are based on Minolta designs and therefore used the same connector, officially named Auto-lock Accessory Shoe, as well up to 2012. Since the electrical protocol remained mostly compatible, TTL and non-TTL adapters exist to adapt ISO-based flashes to iISO hotshoes and vice versa.

Sony also used a variety of other proprietary hotshoes for other digital cameras and camcorders, including the ISO-based 6-pin Cyber-shot hotshoe, the 16-pin Active Interface Shoe (AIS) and the ISO-based 16-pin Intelligent Accessory Shoe (IAS). Some of their NEX cameras used a proprietary Smart Accessory Terminal (versions 1 and 2). In September 2012, Sony announced a new ISO-based 21+3 pin Multi Interface Shoe for use with their future digital cameras and camcorders of the Alpha, NEX, Handycam, NXCAM and Cyber-shot series. This quick-lock hotshoe is mechanically and electrically compatible with a standard 2-pin ISO-518 hotshoe, but electrically compatible with the previous Auto-lock Accessory Shoe with extensions, so that passive adapters ADP-AMA and ADP-MAA allow to use digital-ready iISO flashes on new cameras and some new Multi Interface Shoe equipment on older cameras, while providing compatibility with standard ISO-based equipment as well.

On 12 September 2012, Sony introduced a new 21+3-pin metal-based hotshoe with mechanical quick locking mechanism, called Multi Interface Shoe.
24 pins!!!
see: https://en.wikipedia.org/wiki/Multi_Interface_Shoe
At first sight it resembles a standard ISO 518 hotshoe with just the middle contact and chassis and without any vendor-specific extra contacts, but additional contacts are hidden under the front of the hotshoe. The new hotshoe is mechanically incompatible with the iISO hotshoe, but electrically backwards compatible. The first cameras to use the new hotshoe are the SLT-A99, NEX-6, NEX-VG900, NEX-VG30, DSC-RX1... Then be careful because with the SLT-A99, the new A68 uses a "standard" hot shoe instead of the Minolta-style shoe...
An ADP-MAA adapter to the iISO flash shoe is however provided with the Sony SLT-A99, and the newest flash Sony HVL-F60M, which uses the new hotshoe comes with a reverse adapter ADP-AMA for older Sony and Minolta cameras.

In the case of alpha 65 (has the minolta shoe iISO before sept 2012),
  • many Flash modes: Built-in, pop-up auto, auto, fill-flash, slow Sync., rear Sync., red-eye reduction (on/off selectable for autoflash and fill-flash mode), wireless, off, ADI flash, pre-flash TTL, manual flash
  • and someFlash bracketing 1/3, 1/2, 2/3EV steps for 3 frames (not sufficient for HDR).

First minolta Shoe


Signal NameIOComment
GGground (blue)
F1sync / fire flash (connect G and F1) (red)
F2flash ready signal / data (white) [also: bidirectional serial data line “F2OUT”, “F2IN”]
F3TTL OK signal / clock (black) [also: serial data output: “F3L” + “F3H”]
F4AF assist light control (only on 9000AF, 7000AF and 5000AF)

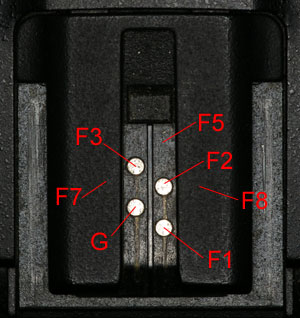
Second minolta Shoe iISO


http://www.mhohner.de/sony-minolta/flashcomp_techref.php

Signal NameIOComment
GGground (blue)
F1sync/fire flash (connect G and F1) (red)
F2flash ready signal/data (white) [also: bidirectional serial data line “F2OUT”, “F2IN”]
F3TTL OK signal/clock (black) [also: serial data output: “F3L” + “F3H”]
F5/VDD1Pflash power, regulated (+5V) & control (only on Dynax/Maxxum 3000i/Alpha 3700i)
F7/PGNDGpower ground (only on Dynax/Maxxum 3000i/Alpha 3700i)
F8/VDD0Pflash power, unregulated (+6V) (only on Dynax/Maxxum 3000i/Alpha 3700i)

Electronic Contacts
The electrical interface and protocol is backward-compatible with the older Minolta hotshoe, except for that it does not support the F4 signal, which was provided by the first generation of Minolta AF SLRs to control the AF illuminator, as this function became part of the digital protocol.

Pin Wire Analog                    Digital
F3 black TTL OK (5V)         Clock
F2 white Ready                     Bidirectional serial data
G blue         Ground                   Ground
F1 red         Sync / trigger flash --

It's a 4 pins system.

1) General protocol informations 

Note: all signals are TTL-compatible (5V)

The protocol uses a unidirectional clock line (signal F3 in service manuals) which is always driven by the cam (then the cam is always the master of time of the protocol). This line selects the command mode and clocks out/in the data bits. The data line (signal F2) is bidirectional. Mode is selected by various high-times of the high-active clock signal:

- data bit clock puse: 40us high, 40us low
- read command/preflash: 90us high, 300us low
- write command: 170us high, 300us low
- announce flash: 270us high, >= 13ms low

The protocol consists of 9 (analog) or 11 (digital) bytes. Each read/write sequence is started by a read or write clock cycle. After each byte there´s a pause of 200us. Bytes are sent LSB first, 8 bits. A complete read transmission looks like this:
- clock high for 90us
- clock low for 300us -> cam will now read on data line
- clock high for 40us, then low for 40us; the data is sampled on the high->low edge
- previous step is repeated 8 times to get 8 bits
- clock is held low for 200us
- next byte is transmitted by setting clock high/low for 40us each
- ...steps 3 to 5 repeated 9(analog) or 11(digital) times to get the data bytes

Write cycle is the same, but it starts with clock high for 170us, the cam then drives data line to put out data.

The cam will send a read sequence first to get information about the flash. The flash indicator only lights when a compatible flash is detected.

The preflash is triggered when the flash receives a "announce flash" (270us high) and then a "read command" (90us high) within 13ms. Main flash is triggered by pulling flash fire (signal F1) low. For exact timing there has to be a "announce flash" command within some ms before the firing (time not critical). Flash is stopped by setting clock high. Minimum flash time is about 30ms on 5400 series flashes - enough for pre-flash (about 140ms before main flash).

2) Data bytes sent by flash 
1. byte - flash capabilities
values: 0x0f, 0x2f, 0x3f
0x0f is sent by 5400xi flash and indicates no HSS (bit 5) and no ADI (bit 4, unsure) capabilities
0x2f is sent by 5400HS - HSS (+), ADI (-)
0x3f - sent by 5600, HSS (+), ADI (+)

2. byte - ?
The value is always 0xf9. If changed, the flash is no longer recognized by cam.

3.-5. byte - zoom reflector position (?)
If the reflector is in bounce position, the bytes are 0xff each. For various zoom settings you´ll get:
0xe3, 0xe2, 0xce - 17mm (5600HS with wide angle diffusor)
0xea, 0xe9, 0xd5 - 24mm
0xeb, 0xea, 0xd6 - 28mm
0xec, 0xeb, 0xd7 - 35mm
0xee, 0xed, 0xd9 - 50mm
0xef, 0xee, 0xda - 70mm on 5600HS, 85mm on 5400HS
0xe0, 0xff, 0xdb - 105mm on 5400HS

6. byte
always 0xff

7. byte
Seems to be a exposure correcting value; setting to wrong value will lead to overexposed pictures. 
This is different on 5400/5600 flashes
5600:
0x94 - 17mm
0x97 - 24mm
0x98 - 28mm
0x99 - 35mm
0x9b - 85mm
0xbf - bounce
5400hs:
0xae - 24mm
0xb0 - 28mm
0xb1 - 35mm
0xb3 - 50mm
0xb4 - 70mm
0xb5 - 85mm
0xb6 - 105mm
0xbf - bounce

The 5600 values have bits 0-5 shiftet right compard to the 5400. Don´t know why...

8. byte
0xf7 - mounted on cam, no bounce reflector position
0xf3 - not mounted on cam
0xff - bounce position

9. byte
0x50 - default value on 5600HS
0x52 - default value on 5400HS
Bits 3 and 4 contain the wireless channel: 00: ch 1, 01: ch 2, 10: ch 3, 11: ch 4)
Meaning of bit 1 not discovered so far.

10.byte
0x3f - 5400hs, always
5600:
0x04 - 17mm
0x05 - 24mm
0x07 - 35mm
0x08 - 50mm
0x09 - 70mm
0x09 - 85mm
0x3f - bounce

11. byte
0x7b - 5600HS
0x8a - 5400hs

3) Data bytes sent by cam 
1.-3. byte
As Matthias Paul discovered, these bytes contain aperture, ISO/program mode and zoom setting. The values are described on this page (sorry, german only, but the tables contain numbers only ;-)) The encoding is the same used for lens rom data
-->404 error

4.-7. byte
0xff, 0xae, 0x7d, 0x40 - no changes, unclear

[edit]5. byte - af illuminator
0xae - illuminator off
0xbe - illuminator on
6. byte HSS
0x7d - no HSS
0xfd - hss
This byte is used by cam to tell the flash if the pending flash should be normal or HSS.
[/edit]


8. byte
0xc0 - Dynax 7D
0x80 - Sony Alpha, Dimage
unclear

9. byte
0xff / 0xef, appears random, unclear

10. byte
after fired preflash: flash duration
DSLR set bits 7&6, Dimage clears 7&6
Bits 0-6 contain time information. Upper and lower 32 values are swapped:
shortest - 0x20...0x3f, 0x00...0x1f - longest
(values given with 6 & 7 cleared, if set, gives 0xe0...0xff, 0xc0...0xdf)

Bytes not sent directly after preflash are
0x00 - Sony alpha, Dimage
0x7c - Dynax 7D, 5D


[edit]
11. byte - shutter speed
0xc0 - Dynax, after preflash (i.e., with valid time info)
0x80 - Dimage, "shutter speed don´t care"
no-HSS:
0xc0 - >=2s, 0xc1 - 1,6s, 0xc2 - 1,3s, 0xc4 - 1s, 0xc5 - 0,8s, 0xc6 - 0,6s, 0xc8 - 0,5s....0xde - 1/100s, 0xe0 - 1/125s, 0xe1 - 1/160s

HSS:
0x61 - 1/160s, 0x62 - 1/200s, 0x64 - 1/250s....0x74 - 1/4000s
[/edit]


Well, that´s all I decoded so far. If you´re intrested in building the adaptor, see www.voitzsch.net/flashconv.html for further details (404 error). You´ll find a schematic based on ATtiny13 and the actual source code to program it. Adaptor works best with 7D in combination with either 5400HS or XI flash. There´s basic support for 5D, alpha and Dimage (i.e., pre- and mainflash is fired, but exposure may vary and not always accurate).

Ref:
http://www.dyxum.com/dforum/topic8297.html (nov 2006)

Few restrictions when using flash with digital cameras. 
This is a summary of these points:

With modern digital cameras (DiMAGE 5, 7, 7i, 7hi, A1, A2, A200, Dynax/Maxxum 7D and 5D, Sony Alpha DSLRs) TTL-OTF metering is not possible. This has a number of consequences:

  • For flash metering either ADI, pre-flash TTL metering or manual flash must be used. This means that only D flashes, the new macro flashes and Sony flashes are fully compatible with digital cameras. These are marked with “yes” in the “digital ready” column of the flash table. Earlier flashes only work in manual flash mode.
  • Wireless flash with ratio control is not available with the built-in flash. A possible workaround is using two remote flashes, positioned at different distances from the subject. You can trigger both remote flashes with the built-in flash, but the built-in flash will not contribute anything to exposure. Wireless ratio flash is possible with several dedicated flashes and several cameras (see the table of working combinations for details).
  • Only certain dedicated flashes mounted on the camera can act as a wireless controller, with certain flashes as the remote flash (see the table of working combinations for details).
  • Older non-D flashes will not fire in wireless mode, even when they are in manual mode.
Ref. http://www.mhohner.de/sony-minolta/flashcomp_digital.php

Third Sony Shoe Multi Interface

  • There are several functions on the MI shoe:
  • Regulated and unregulated power, ground
  • Accessory identification. These inputs determine the function of the other pins!
  • Flash control
  • Analog microphone
  • Electronic viewfinder via an SPI interface
  • GPS via an UART interface
  • WLAN via an SDIO interface
  • Analog audio output


Interoperability across systems

It is possible to mount, say, a Canon flash directly on a Nikon body, and trigger it during the exposure. However, the ISO 518 hot-shoe standard does not govern electronic data transfer between the flash and the body (e.g. for charge and exposure status, TTL metering, ratio, focal length, ISO exposure index, distance, pre-flash metering, modeling light, red-eye reduction burst, wireless control). Different camera makers' dedicated flash systems are, in fact, incompatible in terms of both the proprietary contact layout and the communication protocol. That said, many current wireless radio triggers for professional studio strobe systems remain a relevant real-world application of the basic ISO 518 hot-shoe design. Their use with Sony and Minolta DSLRs requires either the Minolta FS-1100 adapter, now discontinued, or the Sony FA-HS1AM adapter. Named FA-SA1AM (2-8944-030-1), Sony also provided a mechanical-only mount adapter (similar to the FS-1100 but without any contacts) with the HVL-RLAM. There are also various third-party adapters such as the Seagull SC-5 or the Yongnuo YN-H3.
There are also wireless radio triggers for the iISO flash shoe available, like the PixelPawn TF-363, the Phottix Strato II and many other systems.

The Pixel TF-363 

The Pixel TF-363 Pawn Radio Trigger Set allows you to wirelessly trigger your camera, speedlite and/or studio flash unit. The TF-363 is compatible with most Sony and Konica Minolta cameras, most Sony speedlites and most Studio Flash Units. The TF-363 uses a 2.4GHz radio frequency between the transmitter and receiver with a range of 80 meters, providing you with freedom of movement. Further, the 2.4GHz radio frequency enables you to trigger multiple receivers and speedlites, effortlessly.

It's both a wireless flash trigger and a wireless shutter release. As a shutter release it offers three action modes: shoot once, shoot once with 4-second delay, or hold (shoot continuously).

http://www.materiel-photo-pro.com/eclairage-studio-1/pixel-pawn-tf-363-kit-emetteur-recepteur-sans-fil-pour-sony.html

Camera can be remotely controlled via wifi and smartphone

This point will need a long post...

Application : Inexpensive milky way gear

Here's a nice video for milky way shooters, but more interestingly is the relatively inexpensive equipment used, the Sony A6000 and Rokinon/Samyang 12mm F/2 lens. This is mostly the same gear I use for still milky way shots, and  seems to be the standard for budget minded people.  
http://photojottings.com/